An extraordinary paper was published in August 2015 titled A Neural Algorithm of Artistic Style. It showed how a convolutional neural network (CNN) can be used to "paint" a picture that combines the "content" of one image with the "style" of another. The authors illustrated the technique with pictures of Thurbingen, Germany in the style of five classic paintings:

B The Shipwreck of the Minotaur by J.M.W. Turner, 1805. C The Starry Night by Vincent van Gogh, 1889. D Der Schrei by Edvard Munch, 1893. E Femme nue assise by Pablo Picasso, 1910. F Composition VII by Wassily Kandinsky, 1913.
mind=blown. How can computers do this?! Well, in the last post (Cats and dogs and convolutional neural networks), we showed how the convolution layers in a CNN have filters which abstract out aspects of an image. It turns out that we can use certain layers to extract the "content" of an image and others to extract the "style."

Today, we'll implement our own version of "neural style transfer" in Python TensorFlow. The basic method derives from (at least) two papers. It was first demonstrated in A Neural Algorithm of Artistic Style by Gatys, Ecker & Bethge. A number of refinements (some of which I've incorporated) were suggested by Johnson, Alahi & Fei-Fei in their 2016 paper, Perceptual Losses for Real-Time Style Transfer and Super-Resolution. (Both papers are short, readable and contain lots of awesome pictures so, you know, you should take a look).
First we need a convolutional neural network
To start, we're going to need a CNN. We could build our own, but it's much easier to use something off-the-shelf. Gatys et al. used the pre-trained VGG19 model, and we will too.
VGG19 is a deep convolutional neural network built at the University of Oxford (see the paper: Very Deep Convolutional Networks for Large-Scale Image Recognition). It has been trained on the ImageNet dataset: 14-million images from 1,000 categories. VGG19's primary purpose is to identify objects in images, like this:

The model has many layers, including many convolution layers. A diagram of the architecture demonstrates why they call it deep learning:
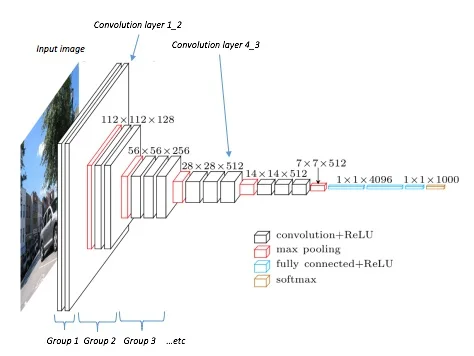
Diagram reproduced from the Heuritech blog
"Deep" because there are lots and lots of layers. The black layers are convolution layers, and they appear in blocks. By convention, I'll be referring to them using their block - so layer conv2_3 refers to the third convolution layer in the second block.
The final layer outputs the probabilities of each of the 1,000 output categories. But that doesn't concern us and, in fact, to speed things up we won't even be including those layers in our implementation. For our purposes, we're only interested in the layers up to convolution layer 5_3.
Extracting the content from a picture
To extract the content from an image, Gatys et al. use convolution layer 5_2. It's trivial to feed an image into the model and generate output from layer 5_2, but how do we take that output and transfer it onto a new image?
Let's say we have a content image ($p$) and we have a target "blank canvas" ($x$) onto which we want to extract and "paint" the content. The basic process is to iteratively tweak the (initially random) target image until it has layer 5_2 outputs similar to the content image. Here's the process in a bit more detail:
- Run the content image $p$ through the model to get the activation output of convolution layer $5\_2$. Let's term that output $P_{5\_2}$.
- Run the (initially random) target image $x$ through the model to get the output of the same layer $5\_2$. Let's term that output $F_{5\_2}$
- Calculate the error ("content cost") between the two outputs. We can use simple squared error cost function: $\sum{(P_{5\_2}-F_{5\_2})^2}$.
- Tweak the target image a little to reduce the error. We back-propagate the error through the model back to the target image, and use that as the basis of our tweaking.
- Repeat steps 2-4 until satisfied. A process of gradient descent
The following lines of code are the essential ones for these steps:
sess.run(net['input'].assign(img_content))
p = sess.run(net[layer_content])
x = net[layer_content]
  [...]
tf.reduce_sum(tf.pow((x - p), 2))
I think this is pretty straightforward, and we already saw in the last post how CNN filters can abstract features like outlines and borders from an image. So I won't do it here but, if you want to, it's quite easy to do by tweaking the implementation code below and removing the style loss.
Extracting the style from a picture
The process of extracting the style from an image is very similar. There are two differences:
- Instead of using just one convolution layer we are going to use five. Gatys et al. use a blend of layers 1_1, 2_1, 3_1, 4_1 and 5_1. All five layers contribute equally to the total style cost (although it is possible to weight them and create different effects).
- Before we pass the outputs of each layer into the squared error cost function, we first apply a function called the Gram matrix. The Gram matrix looks very simple but it's clever and very subtle.
The Gram matrix: First, understand the purpose of the Gram matrix. Gatys et al. say, "We built a style representation that computes the correlations between the different filter responses." They key word here is correlations. Here's the intuition: the Gram matrix aggregates information on similarities across the image and this makes it blind to local, specific objects. In this fashion, it captures stylistic aspects of the image.
Now the mathematics. Start by recalling (from last post) that a convolution layer applies a set of filters over the image, and the output of the layer will itself be a three-dimensional matrix. Let's notate the activation output of a layer as $F_{ij}$, where $j$ is the position (pixel) and $i$ is the filter. The formula for the Gram matrix is then $\sum_{k}F_{ik}F_{jk}$.
I somehow find it easier to understand math if expressed in Python code: if F is the activation output matrix for our layer, then the Gram matrix is the dot product of F and its transpose, ie. in TensorFlow tf.matmul(tf.transpose(F), F).
Now we have a formula for extracting the "style" from an image. We can use the same process described above to "paint" that style. If I paint it onto a "blank" canvas then we can visualise what the style layers are capturing. Here I show the results for each of the five style layers given Van Gogh's the Starry Night as input:

Each of the Gram matrix-transformed style layers are extracting different textures and patterns.
Putting it together: painting both style and content
To paint both style and content we follow a similar process of iterative tweaking but employing a joint cost function that contains both content and style loss:
total cost = content cost + style cost
The style and content will fuse in a single image as we iteratively tweak the canvas to reduce the total cost.


Following Gatys et al., I've used the L-BFGS optimisation algorithm. Although this isn't available in the official TensorFlow "core" library, there is a user contributed implementation in the contrib sublibrary (tf.contrib.opt.ScipyOptimizerInterface).
Implementation
The code:
There are a lot of parameters that can be tweaked to alter the output. It's quite finicky and I found that fiddling was often required to get attractive results. "Attractive" isn't something quantifiable (like, say, percentage correctly predicted) which you can goal-seek, so you have to manually review results and adjust parameters.
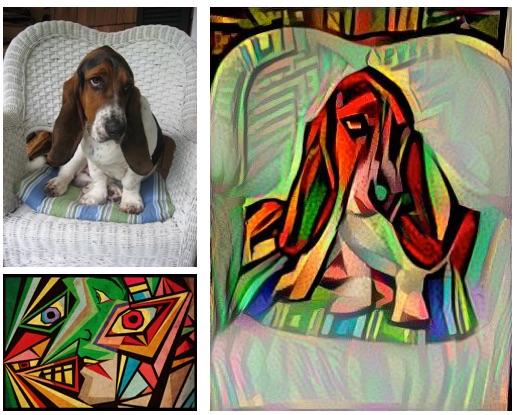
For example, here are two very different results I got fusing a cat with a pencil sketch:

I'm not showing the many more which I discarded because they looked crummy.
The important parameters are:
- Style weight: which allow you to adjust the relative strength of style vs. content.
- Which layers are used for style and content loss: For example, in their original paper, Gatys et al. used layer 5_2 for content and layers 1_1, 2_1, 3_1, 4_1 and 5_1 for style. Johnson et al. prefered different layers and I switched to layer 4_2 for content because I found the results were nicer.
- Initialisation noise: the initial "canvas" is usually some mix of noise and the content image. I've found that more noise gives more space for the style to colonise, but also results in a grainier final product. Most people seem to initialise with no noise and simply start with the content image.
- Number of learning iterations: making these images is very slow and computationally demanding so you don't want to run hundreds of unnecessary iterations. (I worked with quite small images but they could still take hours on my antique MacBook Pro). There's no magic number: sometimes as few as 10 iterations can give a nice result, whilst other times require 100s before things settle down. You can monitor the content and style loss to get a feeling for when improvements are becoming marginal:
 Iteration 10/20
 content loss: 5.89023e+07
 style loss: 1.00091e+11
 total loss: 1.00157e+11
Discussion
Fooling around with this is quite addictive. Here's a few observations accompanied with my favourite outputs.
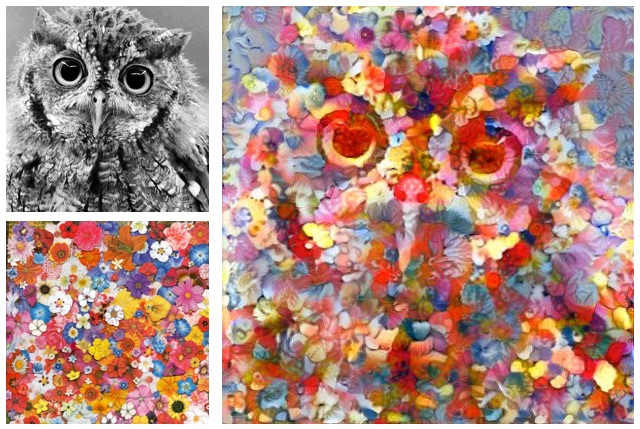
Certain styles work better than others. Impressionist paintings are rich in textures and patterns that tend to transfer very well:

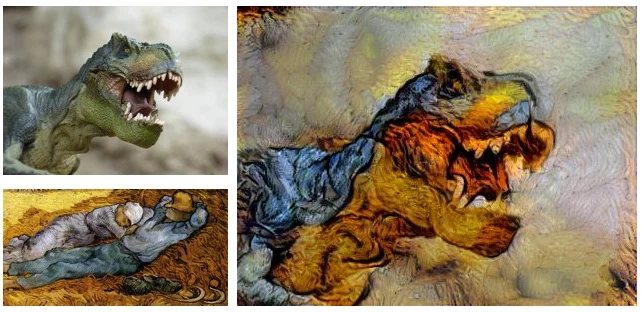
The canonical example is Van Gogh's the Starry Night, which can produce that lovely paintstroke swirl effect in the title image of this post. Van Gogh's paintings do neat things to just about any image:


I also found that many artistic mediums transferred nicely: charcoal, pencil, acrylic paint, and so on.

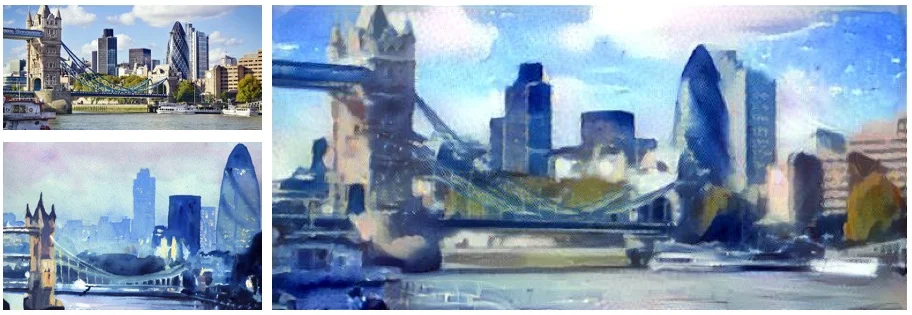
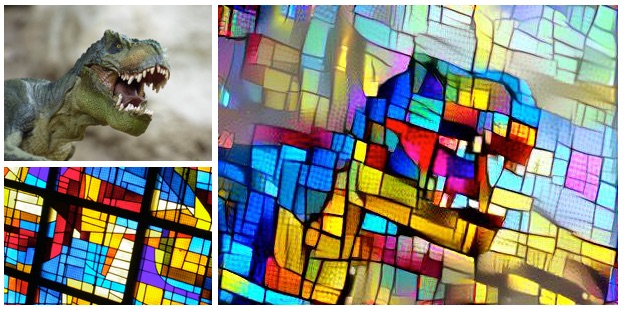
Of course, it's not just artistic styles that transfer. Photographs work just as well:
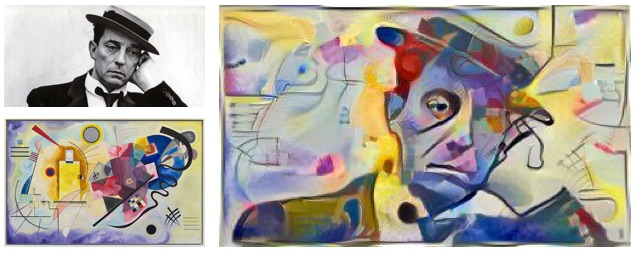
I mentioned earlier that we use the term "style" very loosely. It's fun to discover just what elements are extracted from different style images. In many cases, as we've seen, it's only textures. But in some cases it can be specific features that might be relocated or distorted:

Some styles seem to colonise their host more aggressively than others. Hokusai's The Great Wave off Kanagawa seems particularly parasitic. I especially like what it does to Herman Melville's beard here:

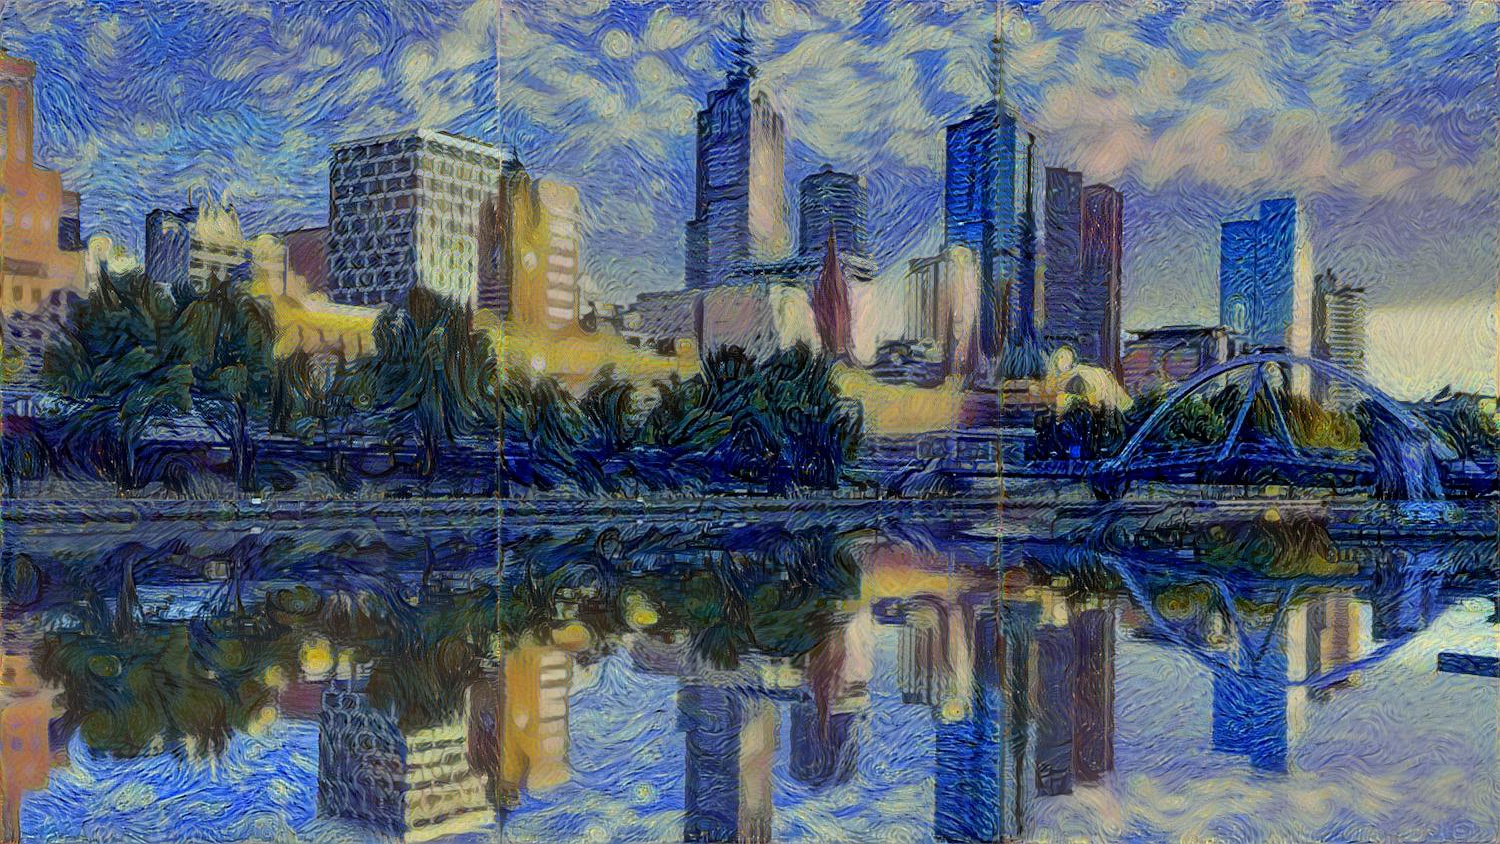
That's all. I'll finish with the image I've used for the header splash (click for full size). To make an image of this size, I took the original content image and divided it into six chunks which I stitched together again afterwards. This was for two reasons: firstly because the full size image required too much memory and CPU to process. Secondly, because the VGG19 model is built for small images and the style extraction doesn't work as well on very large pictures.

Acknowledgements
In developing my code I drew on each of these implementations:
- TensorFlow implementation of Neural Style: https://github.com/cysmith/neural-style-tf
- TensorFlow Implementation of "A Neural Algorithm of Artistic Style": http://www.chioka.in/tensorflow-implementation-neural-algorithm-of-artistic-style
- Neural Artistic Style in Python (uses DeepPy): https://github.com/andersbll/neural_artistic_style
- "A neural algorithm of Artistic style" in tensorflow: https://github.com/woodrush/neural-art-tf
- An implementation of "A Neural Algorithm of Artistic Style": https://github.com/fzliu/style-transfer
- Torch implementation of neural style algorithm: https://github.com/jcjohnson/neural-style
- Convolutional neural networks for artistic style transfer (blog): https://harishnarayanan.org/writing/artistic-style-transfer/
POSTSCRIPT
As I finished writing this post, Facebook announced a new photo filtering feature:

The image they've advertised is a funny choice. The algorithm has transferred the colours from the Starry Night onto the flowers, but none of the textures or patterns. I found this could be achieved by weighting the style cost heavily toward the lower layers (1_1, 2_1). But why would you want to do that? Getting the textures is the best bit.
Facebook also announced they have partnered with an app named Prisma to engineer live style filters for videos:

Which really is amazing. This can't be accomplished using the methods I've described as they're too slow. They use CNNs that have been pre-trained on specific styles.